Editor's Pick
Gallery


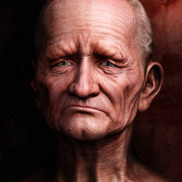
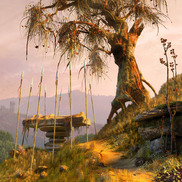
I started this project a long long time ago and have worked on it on and off. Ihave no idea how long I ever actually spent on it but probably way too long. It’s always been my experimental piece so a lot of the stuff on here I hadn’t tried before at the time. It took me down some rabbit holes between not having a strong enough computer to complete the sculpt at one point, obsessing over color detail from all angles thinking about maybe a 3D print or animated poster which lead to wanting to attempt a real hair sim (which ended up being a deep deep rabbit hole, but I settled on a sculpt with a little paint over in the final image here). I decided I finally wanted to wrap up this project so I spent a week wrapping it up and putting together renders for this composite.
The models were started in Maya and finished in Zbrush. Textures were started in Photoshop and finished in Zbrush and Cinema 4D Body Paint and are all hand painted. Final renders we created in Maya Mental Ray and composites in Photoshop. The only minor airbrushing is applied to the hair and feathers, and a couple small composite mask bleeds around the rock.
▼ Images
-
-
Lunchtime Editor's Pick
I' ve always been fascinated by giraffes. After many angle view tests I went for this one. Hope you like it!
Modeled with Maya 8.0, rendered with MentalRay.The fur is polygonal (no Maya fur) I used HRDI/FG and Dof. The background is a photo taken during a recent trip to Borneo and it's been rendered within Maya. No Postwork, only contrast and color gamma enhancement with Photoshop.
Thanks for viewing
19607 Views
-
Sinking Earth Editor's Pick
The idea here is to drop a globe into aquarium to symbolize the final and ultimate end to global warming. I also considered sinking the actual planet in the image, but that wouldnt have been realistic The borders on the map also have a meaning: some world leaders still seem to think that we dont have to do anything because you dont do anything, so borders are part of the problem.
I have written a short making of about the image: Making of Sinking Earth. Copied below:
Sometimes
ideas just pop into my head this image was definitely one of those.
Once I had the idea, I really felt I needed to create the image. This
is a short making of for the image.
The conceptHere the idea is to drop a globe into aquarium to symbolize the
final and ultimate end to global warming. I also considered sinking the
actual planet in the image, but that wouldnt have been realistic The
borders on the map also have a meaning: some world leaders still seem
to think that we dont have to do anything because you dont do
anything, so borders are part of the problem.
The ImageI use Maya and mental ray for my 3D images. This scene was very
simply to model: a sphere, background plates (flat planes), couple of
reflection cards (flat planes), water and bubbles.
(click the image to get a larger view)
WaterWater was originally a nurbs surface that I sculpted to look
like the globe had just been dropped. I then converted the surface to
polygons and added some detail in the depressed area. Finally I added
front and back planes, so I could have the camera outside the
aquarium. Having camera outside the water was important for getting
the materials working correctly (see below).
BubblesBubbles were a little tricky to get the way I wanted. I first tried
particles and particle replacement (with random scaling and rotation
for each bubble), but I didnt like the results. I then started adding
the bubbles manually. I first distorted a subdiv sphere, then placed it
where I wanted. Next I duplicated, moved, rotated and scaled the bubble
to get the next one. This was repeated couple of times. Then I grouped
all the bubbles and duplicated the group. Now I could transform the
whole group, which speeded up the process. I again repeated the
duplication couple of times. I could also select all the bubbles inside
a group and rotate all of them. This changed the look of the group
quickly (because bubbles were not symmetrical).
The globeWell, what can I say.. its a nurbs sphere. There is even a button
to make one in Maya :-p . Textures are from the CIA. (Yes, seriously,
CIA has published and placed in public domain some great looking maps.
These were downloaded from http://www.lib.utexas.edu/maps/world.html.
I combined a geographical and political map to get the final map. The
projection isnt perfect cylinderical mapping, but I simply chose a
view that didnt show anything odd (like a huge white spot the size of
Europe).
Lighting the sceneMaterials for water and bubbles are almost identical: mental ray
dielectric with all colors set to pure white. The only difference is in
ior. In mr rays know in which material they are currently traveling.
The ray ior is set initially to 1.0. When a ray from camera enters
water it has ior of 1.0, so the material has to have ior set to 1.33
(or something like that). Likewise, when the ray enters a bubble it has
the ior of water (1.33), so the bubble material has to have ior of 1.0
(ior of air). When a ray exits a material mr uses out_ior to set the
current ior.I use quite a lot reflection cards with highly reflective and
refractive objects. The idea is to replace lights with self
illuminating objects. Reflection cards work with standard ray tracing
and final gathering, but to get direct or indirect illumination you
would need real lights. I also use many ref card materials all having
different incandescence. This makes it easy to tweak brightness of each
reflection. In this scene the background has colored blend, but
otherwise its just a standard ref card.The globe is lit by three directional lights, two super whites
(brightness about 1.2 -1.6) from top & behind and one dark blue
from below (no shadows for any lights).The first step in lighting the scene was naturally deciding what
kind of look I wanted. I experimented with various looks before finding
the right one. Finally I chose a bright studio look with perfectly
white highlights and high saturation. I used relatively low resolution
(something like 500 x 750), mr Min Sample Level set to -2 and Max
Sample Level set to -1 or 0 to get pretty fast full scene preview
renders. Reflection and refraction limits were set to 8, as was Max
Trace Depth.The bubbles needed a lot of white to look good, so I placed large ref cards behind the blended backgroud and on both sides.
BTW: if you want to learn how to light photographic studio scenes
like this, there is a wonderful book called Light: Science and Magic
(link to amazon below). The book is about real world photography, but
its very useful for 3D stuff also.
18919 Views
-
Box House Editor's Pick
Hi,here one of my design.
A residence with a box concept in shape.Located in jakarta.
I modeling in cad,and render it in vray and a little post work in PS.
Hope you like it
regards
39419 Views
-
Showroom Editor's Pick
car showroom,my design
model in acad render with vray
hope you like it
33359 Views
-
-
chinese folktale:god of marriage Editor's Pick
I am always a fan of chinese folktale
and it is not unusual for me to start one.Below are some basic
information about this character.
God of Marriage
The Old Man in the Moon or the God of Marriage
is Yue-lao, who bears the weighty responsibility of deciding all mortal
marriages. That means the marriage of any couple in the world have been
prearranged by him. Yue-lao ties the future husband and wife together
with an invisible silken cord that never breaks as long as life lasts.
At the appropriate time, the cord brings the predestined mates together
and they wed!
This has been a subject of Chinese poetry and song since
the ancient times.I was busy with academic stuff in SCAD(graduated in
March) and now starting to utilise my free time (while looking for job
in LA) to work on something new.
This piece took me
around 2 weeks because I have to spend time learning Zbrush 3.Rendered
in Mental Ray and some photoshop touchup and compositing.30079 Views
-
-
The Future Editor's Pick
The modelling was done in maya ..The renderer was mental ray.Then it was finally composited in after FX18029 Views
-
-
Zbrush3 William Editor's Pick
Here's another character I did for zbrush 3 beta testing.
The purpose was to build a small pipeline with layers to retrieve skinpores on several models.
You can see a realtime rendering on my website:
(10 megs mov)
http://sebleg.free.fr/2007/sebcesoir_character_1.movIn zbrush 3, you can store each new morfotype in a separate layer, make combinations, change the intensity etc...
Awsome!25561 Views
-
I loved you suzie Editor's Pick
This picture I did to one contest on www.maxarea.com. This contest calls Rendermania. Everyone gets the same model, and the same angle of camera and your aim is to make a best looking render possible. This is my entry - it was modeled by Rezist and Marek Denko.22979 Views
-
It comes a time of day Editor's Pick
"Countless hords of conquerors are approaching. It seems that Gaborn will have to offer alliance to Raj Athen, the same man who killed his father."
This is from a fantasy book series - Runelords. I like it very much, so I was insipired by this book.19606 Views
-
-
aston martin concept Editor's Pick
My aston martin concept,
its a mid engine aston i designed to fit amongst the current aston martins,
rendered in mental ray with some photoshop touch ups
all Nurbs
Regards,
Sabino,...
45843 Views
-
aston martin concept Editor's Pick
this is the rear view of my aston martin concept,....34267 Views
-
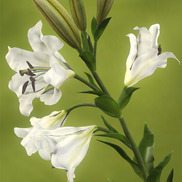
Da Vinci Lily Editor's Pick
One of Leoneardos beutifull paintings/sketches served as inspiration- together with realworld lilies of course. Modeling with Cinema4D, some postwork in Photoshop.
I rendered the picture for printpurpose, about 5000*3400px.
15274 Views
-
-
figure Study 19 Editor's Pick
This image is painted from a reference photo using Expression, Painter and Photoshop. I really love expression. I find that it offers some really unique tools, and endless possibilites. I still can't beleive that I get paid to do what I do!!!!!!!!!!!!!!!!!!!!!!!!!!!!!!!!!
I love the female figure. It is just so amazing.48436 Views
-
stalone caricature Editor's Pick
I wanted to do a 3D version of the amazing kruger's work. his caricatures are just awesome.
i used ZB3 to model it, rnder with vray.
22699 Views